
可编辑表格是现实世界中许多应用程序的重要组成部分。虽然许多优秀的 React 库功能丰富且易于用于编辑表格,但大多数都是付费服务或需要进行定制以满足业务需求。
在本教程中,我们将完成使用TanStack Table创建动态可编辑表格的所有步骤,TanStack Table 是一个无头 UI 库,用于在 React 中构建强大的表和数据网格。由于它只是一个实用程序,因此我们可以完全控制 UI 结构和可编辑元素。我们将介绍到部分基础知识,但建议您具备一些基础知识。
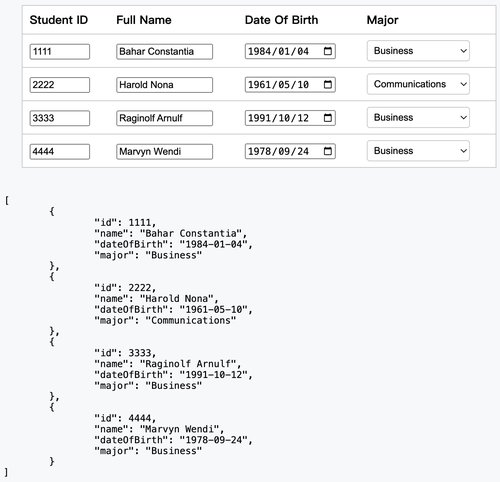
目的是设计一个足够灵活的组件,我们可以为数据源提供列模式,并且表格可以相应地进行调整。
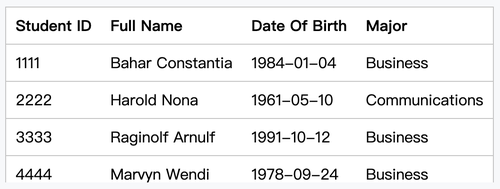
让我们举一个简单的例子;如果我们有下面的数据和列输入,可编辑表格将填充所有单元格的输入文本字段。
const data = [
  {
    studentId: 1111,
    name: "Bahar Constantia",
    dateOfBirth: "1984-01-04",
    major: "Computer Science",
  },
  {
    studentId: 2222,
    name: "Harold Nona",
    dateOfBirth: "1961-05-10",
    major: "Communications",
  },
  {
    studentId: 3333,
    name: "Raginolf Arnulf",
    dateOfBirth: "1991-10-12",
    major: "Business",
  },
  {
    studentId: 4444,
    name: "Marvyn Wendi",
    dateOfBirth: "1978-09-24",
    major: "Psychology",
  },
]
const columns = [
{
header: "Student ID",
type: "text",
},
{
header: "Full Name",
type: "text",
},
{
header: "Date Of Birth",
type: "text",
},
{
header: "Major",
type: "text",
},
]
另一方面,如果某些列类型从“文本”更改为“日期”或“数字”,则表将动态响应并填充日期或数字输入字段而不是文本字段。
const columns = [
  {
    header: "Student ID",
    type: "number",
  },
  {
    header: "Full Name",
    type: "text",
  },
  {
    header: "Date Of Birth",
    type: "date",
  },
  {
    header: "Major",
    type: "select",
  },
]
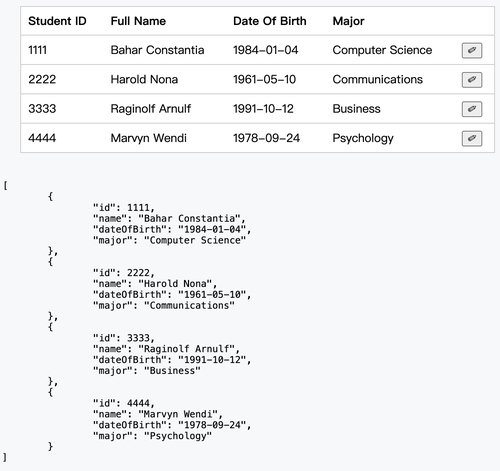
上面的演示是我们希望表格在教程结束时的外观和行为。因此,事不宜迟,让我们深入实施吧🚀
创建一个基本的表格
要开始使用 TanStack Table,我们必须创建模型类型、默认数据和列定义,这对于创建基本表格以及最终的动态可编辑单元格至关重要。更详细的内容请参考官方文档。
type Student = {
  studentId: number;
  name: string;
  dateOfBirth: string;
  major: string;
};

const defaultData: Student[] = [
  {
    studentId: 1111,
    name: "Bahar Constantia",
    dateOfBirth: "1984-01-04",
    major: "Computer Science",
  },
  {
    studentId: 2222,
    name: "Harold Nona",
    dateOfBirth: "1961-05-10",
    major: "Communications",
  },
  {
    studentId: 3333,
    name: "Raginolf Arnulf",
    dateOfBirth: "1991-10-12",
    major: "Business",
  },
  {
    studentId: 4444,
    name: "Marvyn Wendi",
    dateOfBirth: "1978-09-24",
    major: "Psychology",
  },
];

const columnHelper = createColumnHelper<Student>();

const columns = [
  columnHelper.accessor("studentId", {
    header: "Student ID",
  }),
  columnHelper.accessor("name", {
    header: "Full Name",
  }),
  columnHelper.accessor("dateOfBirth", {
    header: "Date Of Birth",
  }),
  columnHelper.accessor("major", {
    header: "Major",
  }),
];columns可以是常规对象,但使用createColumnHelper提供了用于创建不同列定义类型的实用程序。
让我们添加其余的代码来运行基本的 TanStack 表格。
import { useState } from "react";
import "./table.css";

import {
  createColumnHelper,
  flexRender,
  getCoreRowModel,
  useReactTable,
} from "@tanstack/react-table";

type Student = {
  studentId: number;
  name: string;
  dateOfBirth: string;
  major: string;
};

const defaultData: Student[] = [
  {
    studentId: 1111,
    name: "Bahar Constantia",
    dateOfBirth: "1984-01-04",
    major: "Business",
  },
  {
    studentId: 2222,
    name: "Harold Nona",
    dateOfBirth: "1961-05-10",
    major: "Communications",
  },
  {
    studentId: 3333,
    name: "Raginolf Arnulf",
    dateOfBirth: "1991-10-12",
    major: "Business",
  },
  {
    studentId: 4444,
    name: "Marvyn Wendi",
    dateOfBirth: "1978-09-24",
    major: "Business",
  },
];

const columnHelper = createColumnHelper<Student>();

const columns = [
  columnHelper.accessor("studentId", {
    header: "Student ID",
  }),
  columnHelper.accessor("name", {
    header: "Full Name",
  }),
  columnHelper.accessor("dateOfBirth", {
    header: "Date Of Birth",
  }),
  columnHelper.accessor("major", {
    header: "Major",
  }),
];

export const Table = () => {
  const [data, setData] = useState(() => [...defaultData]);

  const table = useReactTable({
    data,
    columns,
    getCoreRowModel: getCoreRowModel(),
  });

  return (
    <table>
      <thead>
        {table.getHeaderGroups().map((headerGroup) => (
          <tr key={headerGroup.id}>
            {headerGroup.headers.map((header) => (
              <th key={header.id}>
                {header.isPlaceholder
                  ? null
                  : flexRender(
                      header.column.columnDef.header,
                      header.getContext()
                    )}
              </th>
            ))}
          </tr>
        ))}
      </thead>
      <tbody>
        {table.getRowModel().rows.map((row) => (
          <tr key={row.id}>
            {row.getVisibleCells().map((cell) => (
              <td key={cell.id}>
                {flexRender(cell.column.columnDef.cell, cell.getContext())}
              </td>
            ))}
          </tr>
        ))}
      </tbody>
    </table>
  );
};
此外,我们还为表格添加了一些样式 - 边距、对齐方式和边框。
table {
  font-family: sans-serif;
  border-collapse: collapse;
  border: 1px solid #ccc;
  margin: 25px;
  background-color: #fff;
}
tr {
  border-bottom: 1px solid #ccc;
}
th,
td {
  text-align: left;
  padding: 8px 10px;
}
添加可编辑单元格
我们将从最直接的方法开始,用输入文本字段替换单元格,并且我们将确保以随着我们进入其他部分而扩展的方式构建代码。
让我们创建一个带有状态和输入字段的新表格单元组件。
const TableCell = () => {
  const [value, setValue] = useState("")

  return <input value={value} onChange={e => setValue(e.target.value)} />
}列定义提供了一个cell属性来渲染我们需要的任何元素,而不是默认的文本值。这样,我们就可以在所有列中添加新的TableCell组件。
const columns = [
  columnHelper.accessor("studentId", {
    header: "Student ID",
    cell: TableCell,
  }),
  columnHelper.accessor("name", {
    header: "Full Name",
    cell: TableCell,
  }),
  columnHelper.accessor("dateOfBirth", {
    header: "Date Of Birth",
    cell: TableCell,
  }),
  columnHelper.accessor("major", {
    header: "Major",
    cell: TableCell,
  }),
]当cell属性渲染组件时,它将提供我们访问表和更新值所需的所有信息。但在此之前,我们需要在主Table组件中创建一个新函数,以根据修改的行和列更新数据。
该函数将具有三个参数 - 行索引、列 id 和值。
export const Table = () => {
  const [data, setData] = useState(() => [...defaultData]);

  const table = useReactTable({
    data,
    columns,
    getCoreRowModel: getCoreRowModel(),
    meta: {
      updateData: (rowIndex: number, columnId: string, value: string) => {
        setData((old) =>
          old.map((row, index) => {
            if (index === rowIndex) {
              return {
                ...old[rowIndex],
                [columnId]: value,
              };
            }
            return row;
          })
        );
      },
    },
  });

return (...);请注意,我们在一个meta对象中添加了该函数,该对象是useReactTable选项的一部分,可以通过table.options.meta 在该表可用的任何地方访问它。
现在我们已经拥有了所需的所有功能和道具,让我们完成TableCell组件来触发更新函数。
const TableCell = ({ getValue, row, column, table }) => {
  const initialValue = getValue()
  const [value, setValue] = useState(initialValue)

  useEffect(() => {
    setValue(initialValue)
  }, [initialValue])

  const onBlur = () => {
    table.options.meta?.updateData(row.index, column.id, value)
  }

  return (
    <input
      value={value}
      onChange={e => setValue(e.target.value)}
      onBlur={onBlur}
    />
)}我们使用onBlur来触发updateData函数,正如我们所看到的,它现在可以通过table.options.meta获取。此外,我们使用getValue向输入字段传递默认值,我们可以从属性中获取该默认值。
现在,让我们将所有内容放在一起,看看到目前为止我们已经得到了什么。
import { useState, useEffect } from "react";
import "./table.css";

import {
  createColumnHelper,
  flexRender,
  getCoreRowModel,
  useReactTable,
} from "@tanstack/react-table";

type Student = {
  studentId: number;
  name: string;
  dateOfBirth: string;
  major: string;
};

const defaultData: Student[] = [
  {
    studentId: 1111,
    name: "Bahar Constantia",
    dateOfBirth: "1984-01-04",
    major: "Business",
  },
  {
    studentId: 2222,
    name: "Harold Nona",
    dateOfBirth: "1961-05-10",
    major: "Communications",
  },
  {
    studentId: 3333,
    name: "Raginolf Arnulf",
    dateOfBirth: "1991-10-12",
    major: "Business",
  },
  {
    studentId: 4444,
    name: "Marvyn Wendi",
    dateOfBirth: "1978-09-24",
    major: "Business",
  },
];

const TableCell = ({ getValue, row, column, table }) => {
  const initialValue = getValue();
  const [value, setValue] = useState(initialValue);

  useEffect(() => {
    setValue(initialValue);
  }, [initialValue]);

  const onBlur = () => {
    table.options.meta?.updateData(row.index, column.id, value);
  };

  return (
    <input
      value={value}
      onChange={(e) => setValue(e.target.value)}
      onBlur={onBlur}
    />
  );
};

const columnHelper = createColumnHelper<Student>();

const columns = [
  columnHelper.accessor("studentId", {
    header: "Student ID",
    cell: TableCell,
  }),
  columnHelper.accessor("name", {
    header: "Full Name",
    cell: TableCell,
  }),
  columnHelper.accessor("dateOfBirth", {
    header: "Date Of Birth",
    cell: TableCell,
  }),
  columnHelper.accessor("major", {
    header: "Major",
    cell: TableCell,
  }),
];

export const Table = () => {
  const [data, setData] = useState(() => [...defaultData]);

  const table = useReactTable({
    data,
    columns,
    getCoreRowModel: getCoreRowModel(),
    meta: {
      updateData: (rowIndex: number, columnId: string, value: string) => {
        setData((old) =>
          old.map((row, index) => {
            if (index === rowIndex) {
              return {
                ...old[rowIndex],
                [columnId]: value,
              };
            }
            return row;
          })
        );
      },
    },
  });

  return (
    <>
      <table>
        <thead>
          {table.getHeaderGroups().map((headerGroup) => (
            <tr key={headerGroup.id}>
              {headerGroup.headers.map((header) => (
                <th key={header.id}>
                  {header.isPlaceholder
                    ? null
                    : flexRender(
                        header.column.columnDef.header,
                        header.getContext()
                      )}
                </th>
              ))}
            </tr>
          ))}
        </thead>
        <tbody>
          {table.getRowModel().rows.map((row) => (
            <tr key={row.id}>
              {row.getVisibleCells().map((cell) => (
                <td key={cell.id}>
                  {flexRender(cell.column.columnDef.cell, cell.getContext())}
                </td>
              ))}
            </tr>
          ))}
        </tbody>
      </table>
      <pre>{JSON.stringify(data, null, "\t")}</pre>
    </>
  );
};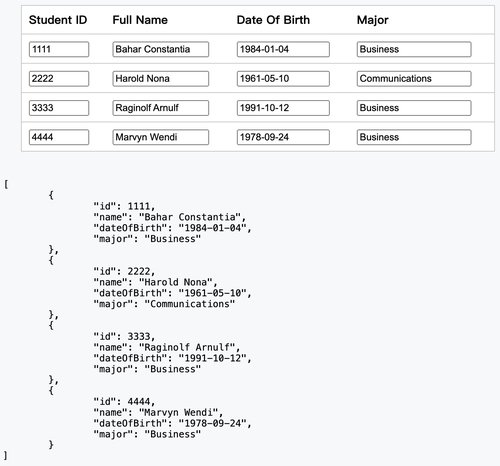
该对象在最后打印出来,以验证输入更新是否按预期工作。
支持动态类型
到目前为止,我们已经创建了一个仅支持文本字段的可编辑表格。正如简介中提到的,目标是能够定义不同的列类型并动态呈现适当的元素。
让我们首先向columns对象添加一个新的type属性。
const columns = [
  columnHelper.accessor("studentId", {
    header: "Student ID",
    cell: TableCell,
    meta: {
      type: "number",
    },
  }),
  columnHelper.accessor("name", {
    header: "Full Name",
    cell: TableCell,
    meta: {
      type: "text",
    },
  }),
  columnHelper.accessor("dateOfBirth", {
    header: "Date Of Birth",
    cell: TableCell,
    meta: {
      type: "date",
    },
  }),
  columnHelper.accessor("major", {
    header: "Major",
    cell: TableCell,
    meta: {
      type: "text",
    },
  }),
]与表格类似,列提供了一个meta对象来添加我们想要的任何内容。我们需要做的就是从meta对象中获取类型并将其传递到TableCell组件中的输入字段。
const TableCell = ({ getValue, row, column, table }) => {
  const initialValue = getValue()
  const [value, setValue] = useState(initialValue)

  useEffect(() => {
    setValue(initialValue)
  }, [initialValue])

  const onBlur = () => {
    table.options.meta?.updateData(row.index, column.id, value)
  }

  return (
    <input
      value={value}
      onChange={e => setValue(e.target.value)}
      onBlur={onBlur}
      type={column.columnDef.meta?.type || "text"}
    />
  )}
瞧!太快了!
如果我们想要更复杂的数据类型(例如选择元素)怎么办?好吧,为此,我们需要做更多的工作 🙂
以下是我们需要遵循的步骤:
- 将“Major”列类型更改为“select”并提供列
meta中的所有选择选项。请记住,我们希望使其尽可能动态以支持不同的数据模型。 - 在
TableCell组件中引入一个新select元素,它将填充列meta对象中的所有选项。
type Option = {
  label: string;
  value: string;
};

const TableCell = ({ getValue, row, column, table }) => {
  const initialValue = getValue();
  const columnMeta = column.columnDef.meta;
  const tableMeta = table.options.meta;
  const [value, setValue] = useState(initialValue);

  useEffect(() => {
    setValue(initialValue);
  }, [initialValue]);

  const onBlur = () => {
    tableMeta?.updateData(row.index, column.id, value);
  };

  const onSelectChange = (e: ChangeEvent<HTMLSelectElement>) => {
    setValue(e.target.value);
    tableMeta?.updateData(row.index, column.id, e.target.value);
  };

  return columnMeta?.type === "select" ? (
    <select onChange={onSelectChange} value={initialValue}>
      {columnMeta?.options?.map((option: Option) => (
        <option key={option.value} value={option.value}>{option.label}</option>
      ))}
    </select>
  ) : (
    <input
      value={value}
      onChange={(e) => setValue(e.target.value)}
      onBlur={onBlur}
      type={columnMeta?.type || "text"}
    />
  );
};

const columnHelper = createColumnHelper<Student>();

const columns = [
  columnHelper.accessor("studentId", {
    header: "Student ID",
    cell: TableCell,
    meta: {
      type: "number",
    },
  }),
  columnHelper.accessor("name", {
    header: "Full Name",
    cell: TableCell,
    meta: {
      type: "text",
    },
  }),
  columnHelper.accessor("dateOfBirth", {
    header: "Date Of Birth",
    cell: TableCell,
    meta: {
      type: "date",
    },
  }),
  columnHelper.accessor("major", {
    header: "Major",
    cell: TableCell,
    meta: {
      type: "select",
      options: [
        { value: "Computer Science", label: "Computer Science" },
        { value: "Communications", label: "Communications" },
        { value: "Business", label: "Business" },
        { value: "Psychology", label: "Psychology" },
      ],
    },
  }),
];
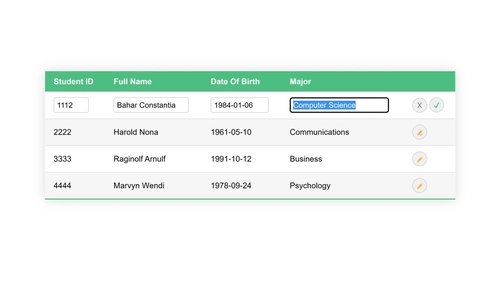
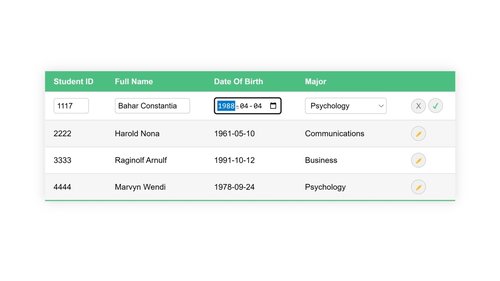
正如我们在上面的代码和演示中看到的,“number”、“date”和“select”以及它的选项都正确显示。对于select元素,我们定义了一个新的onSelectChange事件来触发更新函数。此外,我们还进行了一些代码清理,以简化访问column和table。
可编辑行
我们经常希望表格是只读的,并根据需要切换到编辑模式。原因可能是性能增强或想要向服务器提交数据,因此要避免在每个字段上触发 API 调用。
常见的做法是在新列中添加一个操作按钮,该按钮将在编辑和非编辑模式之间切换该行。它还将包含取消操作,以防用户想要中止更改。
让我们首先创建一个editedRows状态,一个指示哪些行处于编辑模式的键/值对象。我们还将 getter 和 setter 添加到表meta中,以便我们可以从其他组件访问它。
export const Table = () => {
  const [data, setData] = useState(() => [...defaultData]);
  const [editedRows, setEditedRows] = useState({});

  const table = useReactTable({
    data,
    columns,
    getCoreRowModel: getCoreRowModel(),
    meta: {
      editedRows,
      setEditedRows,
      ...
    },
  });

  return (...);
};然后,我们可以创建一个带有“编辑”、“取消”和“完成”按钮的EditCell组件。editedRows仅当包含设置为true的行 id 时,才会显示“cancel”和“done”。通过getCoreRowModel函数,会自动为每一行生成唯一的行 id。
const EditCell = ({ row, table }) => {
  const meta = table.options.meta

  const setEditedRows = (e: MouseEvent<HTMLButtonElement>) => {
    meta?.setEditedRows((old: []) => ({
      ...old,
      [row.id]: !old[row.id],
    }))
  }

  return meta?.editedRows[row.id] ? (
    <>
      <button>X</button> <button onClick={setEditedRows}>✔</button>
    </>
  ) : (
    <button onClick={setEditedRows}>✐</button>
  )
}我们还定义了一个事件,使用我们刚刚在meta选项中传递的 setter 函数对当前行 id 进行简单的真/假切换。
现在,必须将该组件放置在新列中。TanStack Table 提供了一个display列选项,这意味着它不会成为数据模型的一部分,因为它的唯一目的是管理可编辑状态。
const columns = [
  columnHelper.accessor("studentId", {
    header: "Student ID",
    cell: TableCell,
    meta: {
      type: "number",
    },
  }),
  columnHelper.accessor("name", {
    header: "Full Name",
    cell: TableCell,
    meta: {
      type: "text",
    },
  }),
  columnHelper.accessor("dateOfBirth", {
    header: "Date Of Birth",
    cell: TableCell,
    meta: {
      type: "date",
    },
  }),
  columnHelper.accessor("major", {
    header: "Major",
    cell: TableCell,
    meta: {
      type: "select",
      options: [
        { value: "Computer Science", label: "Computer Science" },
        { value: "Communications", label: "Communications" },
        { value: "Business", label: "Business" },
        { value: "Psychology", label: "Psychology" },
      ],
    },
  }),
  columnHelper.display({
    id: "edit",
    cell: EditCell,
  }),
]TableCell组件可以通过检查表meta对象中的editedRows轻松在编辑和非编辑模式之间切换。
const TableCell = ({ getValue, row, column, table }) => {
  const initialValue = getValue()
  const columnMeta = column.columnDef.meta
  const tableMeta = table.options.meta
  const [value, setValue] = useState(initialValue)

  useEffect(() => {
    setValue(initialValue)
  }, [initialValue])

  const onBlur = () => {
    tableMeta?.updateData(row.index, column.id, value)
  }

  const onSelectChange = (e: ChangeEvent<HTMLSelectElement>) => {
    setValue(e.target.value)
    tableMeta?.updateData(row.index, column.id, e.target.value)
  }

  if (tableMeta?.editedRows[row.id]) {
    return columnMeta?.type === "select" ? (
      <select onChange={onSelectChange} value={initialValue}>
        {columnMeta?.options?.map((option: Option) => (
          <option key={option.value} value={option.value}>
            {option.label}
          </option>
        ))}
      </select>
    ) : (
      <input
        value={value}
        onChange={e => setValue(e.target.value)}
        onBlur={onBlur}
        type={columnMeta?.type || "text"}
      />
    )
  }
  return <span>{value}</span>
}
最后但并非最不重要的一点是,实施取消操作。虽然有多种方法可以实现这一目标,但根据业务规则和数据流,我们将在本教程中采用一种简单的方法。
让我们创建一个data数组的副本originalData。如果用户选择保存该行,它将使用新更新的行更新originalData。否则,它将恢复到原始行。
在可编辑表组件中,我们可以添加具有恢复函数的新状态。
export const Table = () => {
  const [data, setData] = useState(() => [...defaultData]);
  const [originalData, setOriginalData] = useState(() => [...defaultData]);
  const [editedRows, setEditedRows] = useState({});

  const table = useReactTable({
    data,
    columns,
    getCoreRowModel: getCoreRowModel(),
    meta: {
      editedRows,
      setEditedRows,
      revertData: (rowIndex: number, revert: boolean) => {
        if (revert) {
          setData((old) =>
            old.map((row, index) =>
              index === rowIndex ? originalData[rowIndex] : row
            )
          );
        } else {
          setOriginalData((old) =>
            old.map((row, index) => (index === rowIndex ? data[rowIndex] : row))
          );
        }
      },
      updateData: ...
  });

  return (...)
};在EditCell组件中,我们可以在触发“取消”或“完成”按钮时调用该函数。
const EditCell = ({ row, table }) => {
  const meta = table.options.meta

  const setEditedRows = (e: MouseEvent<HTMLButtonElement>) => {
    const elName = e.currentTarget.name
    meta?.setEditedRows((old: []) => ({
      ...old,
      [row.id]: !old[row.id],
    }))
    if (elName !== "edit") {
      meta?.revertData(row.index, e.currentTarget.name === "cancel")
    }
  }

  return meta?.editedRows[row.id] ? (
    <>
      <button onClick={setEditedRows} name="cancel">
        X
      </button>{" "}
      <button onClick={setEditedRows} name="done">
        ✔
      </button>
    </>
  ) : (
    <button onClick={setEditedRows} name="edit">
      ✐
    </button>
  )
}
这是我们迄今为止所拥有的代码和演示。
import { useState, useEffect, ChangeEvent, MouseEvent } from "react";
import "./table.css";

import {
  createColumnHelper,
  flexRender,
  getCoreRowModel,
  useReactTable,
} from "@tanstack/react-table";

type Student = {
  studentId: number;
  name: string;
  dateOfBirth: string;
  major: string;
};

type Option = {
  label: string;
  value: string;
};

const defaultData: Student[] = [
  {
    studentId: 1111,
    name: "Bahar Constantia",
    dateOfBirth: "1984-01-04",
    major: "Computer Science",
  },
  {
    studentId: 2222,
    name: "Harold Nona",
    dateOfBirth: "1961-05-10",
    major: "Communications",
  },
  {
    studentId: 3333,
    name: "Raginolf Arnulf",
    dateOfBirth: "1991-10-12",
    major: "Business",
  },
  {
    studentId: 4444,
    name: "Marvyn Wendi",
    dateOfBirth: "1978-09-24",
    major: "Psychology",
  },
];

const TableCell = ({ getValue, row, column, table }) => {
  const initialValue = getValue();
  const columnMeta = column.columnDef.meta;
  const tableMeta = table.options.meta;
  const [value, setValue] = useState(initialValue);

  useEffect(() => {
    setValue(initialValue);
  }, [initialValue]);

  const onBlur = () => {
    tableMeta?.updateData(row.index, column.id, value);
  };

  const onSelectChange = (e: ChangeEvent<HTMLSelectElement>) => {
    setValue(e.target.value);
    tableMeta?.updateData(row.index, column.id, e.target.value);
  };

  if (tableMeta?.editedRows[row.id]) {
    return columnMeta?.type === "select" ? (
      <select onChange={onSelectChange} value={initialValue}>
        {columnMeta?.options?.map((option: Option) => (
          <option key={option.value} value={option.value}>{option.label}</option>
        ))}
      </select>
    ) : (
      <input
        value={value}
        onChange={(e) => setValue(e.target.value)}
        onBlur={onBlur}
        type={columnMeta?.type || "text"}
      />
    );
  }
  return <span>{value}</span>;
};

const EditCell = ({ row, table }) => {
  const meta = table.options.meta;

  const setEditedRows = (e: MouseEvent<HTMLButtonElement>) => {
    const elName = e.currentTarget.name;
    meta?.setEditedRows((old: []) => ({
      ...old,
      [row.id]: !old[row.id],
    }));
    if (elName !== "edit") {
      meta?.revertData(row.index, e.currentTarget.name === "cancel");
    }
  };

  return (
    <div className="edit-cell-container">
      {meta?.editedRows[row.id] ? (
        <div className="edit-cell">
          <button onClick={setEditedRows} name="cancel">
            X
          </button>
          <button onClick={setEditedRows} name="done">
            ✔
          </button>
        </div>
      ) : (
        <button onClick={setEditedRows} name="edit">
          ✐
        </button>
      )}
    </div>
  );
};

const columnHelper = createColumnHelper<Student>();

const columns = [
  columnHelper.accessor("studentId", {
    header: "Student ID",
    cell: TableCell,
    meta: {
      type: "number",
    },
  }),
  columnHelper.accessor("name", {
    header: "Full Name",
    cell: TableCell,
    meta: {
      type: "text",
    },
  }),
  columnHelper.accessor("dateOfBirth", {
    header: "Date Of Birth",
    cell: TableCell,
    meta: {
      type: "date",
    },
  }),
  columnHelper.accessor("major", {
    header: "Major",
    cell: TableCell,
    meta: {
      type: "select",
      options: [
        { value: "Computer Science", label: "Computer Science" },
        { value: "Communications", label: "Communications" },
        { value: "Business", label: "Business" },
        { value: "Psychology", label: "Psychology" },
      ],
    },
  }),
  columnHelper.display({
    id: "edit",
    cell: EditCell,
  }),
];

export const Table = () => {
  const [data, setData] = useState(() => [...defaultData]);
  const [originalData, setOriginalData] = useState(() => [...defaultData]);
  const [editedRows, setEditedRows] = useState({});

  const table = useReactTable({
    data,
    columns,
    getCoreRowModel: getCoreRowModel(),
    meta: {
      editedRows,
      setEditedRows,
      revertData: (rowIndex: number, revert: boolean) => {
        if (revert) {
          setData((old) =>
            old.map((row, index) =>
              index === rowIndex ? originalData[rowIndex] : row
            )
          );
        } else {
          setOriginalData((old) =>
            old.map((row, index) => (index === rowIndex ? data[rowIndex] : row))
          );
        }
      },
      updateData: (rowIndex: number, columnId: string, value: string) => {
        setData((old) =>
          old.map((row, index) => {
            if (index === rowIndex) {
              return {
                ...old[rowIndex],
                [columnId]: value,
              };
            }
            return row;
          })
        );
      },
    },
  });

  return (
    <>
      <table>
        <thead>
          {table.getHeaderGroups().map((headerGroup) => (
            <tr key={headerGroup.id}>
              {headerGroup.headers.map((header) => (
                <th key={header.id}>
                  {header.isPlaceholder
                    ? null
                    : flexRender(
                        header.column.columnDef.header,
                        header.getContext()
                      )}
                </th>
              ))}
            </tr>
          ))}
        </thead>
        <tbody>
          {table.getRowModel().rows.map((row) => (
            <tr key={row.id}>
              {row.getVisibleCells().map((cell) => (
                <td key={cell.id}>
                  {flexRender(cell.column.columnDef.cell, cell.getContext())}
                </td>
              ))}
            </tr>
          ))}
        </tbody>
      </table>
      <pre>{JSON.stringify(data, null, "\t")}</pre>
    </>
  );
};
表格添加样式和重构
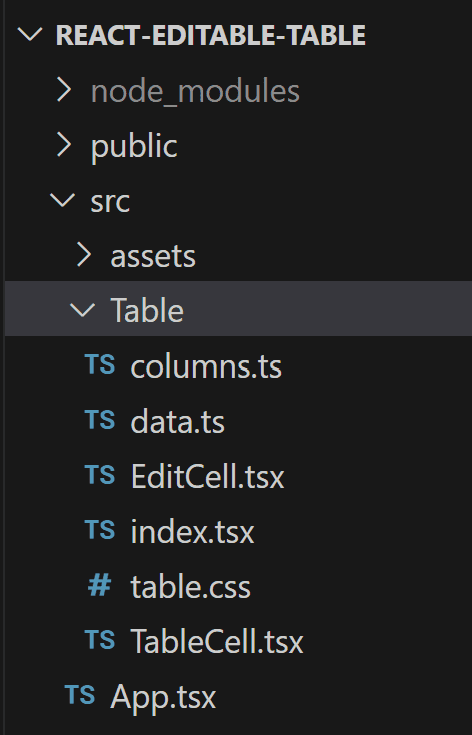
重构就像将每个组件提取到自己的tsx文件中一样简单,以使主表组件更小、更精简,最终更易于维护。
以下是我们想要提取到单独文件中的所有组件:
index将包含可由使用者导入的主表组件,如下所示。
import { Table } from "./Table"

function App() {
  return <Table />
}

export default App
其余的组件与我们在前面部分中处理的组件相同,但作为独立的组件移动到单独的文件中,并在需要时导入。
所有文件和代码重构都将在下一节中提供。
为了完成本教程,让我们犒劳一下自己,用简单而有效的 CSS 来设计表格 🙂
table {
  border-collapse: collapse;
  margin: 25px 0;
  font-size: 14px;
  font-family: sans-serif;
  box-shadow: 0 0 20px rgba(0, 0, 0, 0.15);
  width: 720px;
}

table thead tr {
  background-color: #4bbd7f;
  color: #ffffff;
  text-align: left;
}

table th,
table td {
  padding: 10px 15px;
}

table tbody tr {
  border-bottom: 1px solid #dddddd;
}

table tbody tr:nth-of-type(even) {
  background-color: #f6f6f6;
}

table tbody tr:last-of-type {
  border-bottom: 2px solid #4bbd7f;
}

table tbody tr.active-row {
  font-weight: bold;
  color: #4bbd7f;
}

table td:first-child input {
  width: 50px;
}

table td:nth-child(2) input {
  width: 120px;
}

table .edit-cell-container button {
  border-radius: 50px;
  height: 26px;
  width: 26px;
  border: 1px solid #ccc;
  color: #ffb918;
}

table button[name="cancel"] {
  color: #7b7b7b;
}

table button[name="done"] {
  color: #4bbd7f;
}

table input,
select {
  border: 1px solid #ccc;
  border-radius: 4px;
  padding: 5px;
}

table .edit-cell {
  display: flex;
  gap: 5px;
}
这里没有什么不寻常的,一些带有行颜色、边框、边距和宽度的表格阴影!
完整代码
完整的代码可以在这个仓库中找到。如果您喜欢本教程,请为仓库加星,可以随时提出新功能的需求!
总结
在本教程中,我们学习了如何利用 TanckStack 构建动态 React 可编辑表格,该表格支持自定义列模式和行编辑、保存和取消操作。
我们共同探索的解决方案是我们可以采取的几种不同方法之一。我们也没有考虑任何性能影响。因此,强烈建议根据业务需求进行性能测试,并评估代码是否需要设计模式调整,例如使用 React memo、信号或状态管理来提高性能水平。