StreamDiffusion 是一种新设计的扩散管道,专为实时交互生成而设计。它为当前基于扩散的图像生成技术带来了显著的性能增强。
主要特性
- 流批处理
- 通过高效的批处理操作简化数据处理。
- 无残差分类器引导-了解更多
- 改进的引导机制可最大限度地减少计算冗余。
- 随机相似性过滤器-了解更多
- 通过先进的过滤技术提高GPU利用效率。
- IO队列
- 有效管理输入和输出操作,以实现更顺畅的执行。
- KV-Cache的预计算
- 优化缓存策略以加速处理。
- 模型加速工具
- 利用各种工具进行模型优化和性能提升。
当在 GPU RTX 4090、CPU Core i9-13900K 和操作系统 Ubuntu 22.04.3 LTS 的环境中使用我们建议的 StreamDiffusion 管道生成图像时:
| 模型 | 去噪步骤 | fps(文本到图像) | fps(图像到图像) |
|---|---|---|---|
| SD-turbo | 1 | 106.16 | 93.897 |
| LCM-LoRA + KohakuV2 | 4 | 38.023 | 37.133 |
请用提供的链接随意探索每个功能,以了解有关 StreamDiffusion 的更多信息。如果您觉得有帮助,请考虑引用该工作:
@article{kodaira2023streamdiffusion,
      title={StreamDiffusion: A Pipeline-level Solution for Real-time Interactive Generation},
      author={Akio Kodaira and Chenfeng Xu and Toshiki Hazama and Takanori Yoshimoto and Kohei Ohno and Shogo Mitsuhori and Soichi Sugano and Hanying Cho and Zhijian Liu and Kurt Keutzer},
      year={2023},
      eprint={2312.12491},
      archivePrefix={arXiv},
      primaryClass={cs.CV}
}
安装
前置步骤:克隆这个存储库
git clone https://github.com/cumulo-autumn/StreamDiffusion.git
第一步:搭建环境
您可以通过 pip、conda 或 Docker 安装 StreamDiffusion。
conda create -n streamdiffusion python=3.10
conda activate streamdiffusion
或者
python -m venv .venv
# Windows
.\.venv\Scripts\activate
# Linux
source .venv/bin/activate
第二步:安装PyTorch
选择适合您的系统的版本。
CUDA 11.8
pip3 install torch==2.1.0 torchvision==0.16.0 xformers --index-url https://download.pytorch.org/whl/cu118
CUDA 12.1
pip3 install torch==2.1.0 torchvision==0.16.0 xformers --index-url https://download.pytorch.org/whl/cu121
详细信息:https://pytorch.org/
第三步:安装StreamDiffusion
对于用户
安装 StreamDiffusion
#for Latest Version (recommended)
pip install git+https://github.com/cumulo-autumn/StreamDiffusion.git@main#egg=streamdiffusion[tensorrt]


#or


#for Stable Version
pip install streamdiffusion[tensorrt]
安装 TensorRT 扩展
python -m streamdiffusion.tools.install-tensorrt
(仅针对Windows)如果您安装了稳定版本(pip install streamdiffusion[tensorrt]),您可能需要额外安装pywin32 。
pip install --force-reinstall pywin32
对于开发者
python setup.py develop easy_install streamdiffusion[tensorrt]
python -m streamdiffusion.tools.install-tensorrt
Docker 安装(TensorRT 就绪)
git clone https://github.com/cumulo-autumn/StreamDiffusion.git
cd StreamDiffusion
docker build -t stream-diffusion:latest -f Dockerfile .
docker run --gpus all -it -v $(pwd):/home/ubuntu/streamdiffusion stream-diffusion:latest
快速开始
您可以在examples目录中尝试 StreamDiffusion。
实时文本到图像的演示
目录中有一个交互式 txt2img 演示demo/realtime-txt2img!
实时图像到图像的演示
目录中有一个实时 img2img 演示,其中包含实时网络摄像头提要或网络浏览器上的屏幕捕获demo/realtime-img2img!
使用示例
我们提供了一个如何使用 StreamDiffusion 的简单示例。更详细的例子请参考examples目录。
图像到图像
import torch
from diffusers import AutoencoderTiny, StableDiffusionPipeline
from diffusers.utils import load_image

from streamdiffusion import StreamDiffusion
from streamdiffusion.image_utils import postprocess_image

# You can load any models using diffuser's StableDiffusionPipeline
pipe = StableDiffusionPipeline.from_pretrained("KBlueLeaf/kohaku-v2.1").to(
    device=torch.device("cuda"),
    dtype=torch.float16,
)

# Wrap the pipeline in StreamDiffusion
stream = StreamDiffusion(
    pipe,
    t_index_list=[32, 45],
    torch_dtype=torch.float16,
)

# If the loaded model is not LCM, merge LCM
stream.load_lcm_lora()
stream.fuse_lora()
# Use Tiny VAE for further acceleration
stream.vae = AutoencoderTiny.from_pretrained("madebyollin/taesd").to(device=pipe.device, dtype=pipe.dtype)
# Enable acceleration
pipe.enable_xformers_memory_efficient_attention()


prompt = "1girl with dog hair, thick frame glasses"
# Prepare the stream
stream.prepare(prompt)

# Prepare image
init_image = load_image("assets/img2img_example.png").resize((512, 512))

# Warmup >= len(t_index_list) x frame_buffer_size
for _ in range(2):
    stream(init_image)

# Run the stream infinitely
while True:
    x_output = stream(init_image)
    postprocess_image(x_output, output_type="pil")[0].show()
    input_response = input("Press Enter to continue or type 'stop' to exit: ")
    if input_response == "stop":
        break
文本转图像
import torch
from diffusers import AutoencoderTiny, StableDiffusionPipeline

from streamdiffusion import StreamDiffusion
from streamdiffusion.image_utils import postprocess_image

# You can load any models using diffuser's StableDiffusionPipeline
pipe = StableDiffusionPipeline.from_pretrained("KBlueLeaf/kohaku-v2.1").to(
    device=torch.device("cuda"),
    dtype=torch.float16,
)

# Wrap the pipeline in StreamDiffusion
# Requires more long steps (len(t_index_list)) in text2image
# You recommend to use cfg_type="none" when text2image
stream = StreamDiffusion(
    pipe,
    t_index_list=[0, 16, 32, 45],
    torch_dtype=torch.float16,
    cfg_type="none",
)

# If the loaded model is not LCM, merge LCM
stream.load_lcm_lora()
stream.fuse_lora()
# Use Tiny VAE for further acceleration
stream.vae = AutoencoderTiny.from_pretrained("madebyollin/taesd").to(device=pipe.device, dtype=pipe.dtype)
# Enable acceleration
pipe.enable_xformers_memory_efficient_attention()


prompt = "1girl with dog hair, thick frame glasses"
# Prepare the stream
stream.prepare(prompt)

# Warmup >= len(t_index_list) x frame_buffer_size
for _ in range(4):
    stream()

# Run the stream infinitely
while True:
    x_output = stream.txt2img()
    postprocess_image(x_output, output_type="pil")[0].show()
    input_response = input("Press Enter to continue or type 'stop' to exit: ")
    if input_response == "stop":
        break
您可以使用 SD-Turbo 使其更快。
更快的生成
将上面示例中的以下代码替换为以下代码。
pipe.enable_xformers_memory_efficient_attention()
到
from streamdiffusion.acceleration.tensorrt import accelerate_with_tensorrt

stream = accelerate_with_tensorrt(
    stream, "engines", max_batch_size=2,
)
它需要 TensorRT 扩展和构建引擎的时间,但它会比上面的示例更快。
选项
随机相似度过滤器
随机相似性过滤器通过在与前一帧变化不大时最小化转换操作来减少视频输入期间的处理,从而减轻 GPU 处理负载,如上面 GIF 中的红框所示。用法如下:
stream = StreamDiffusion(
    pipe,
    [32, 45],
    torch_dtype=torch.float16,
)
stream.enable_similar_image_filter(
    similar_image_filter_threshold,
    similar_image_filter_max_skip_frame,
)
可以将以下参数设置为函数中的参数:
similar_image_filter_threshold
- 暂停处理前前一帧与当前帧之间的相似度阈值。
similar_image_filter_max_skip_frame
- 恢复转换之前暂停期间的最大间隔。
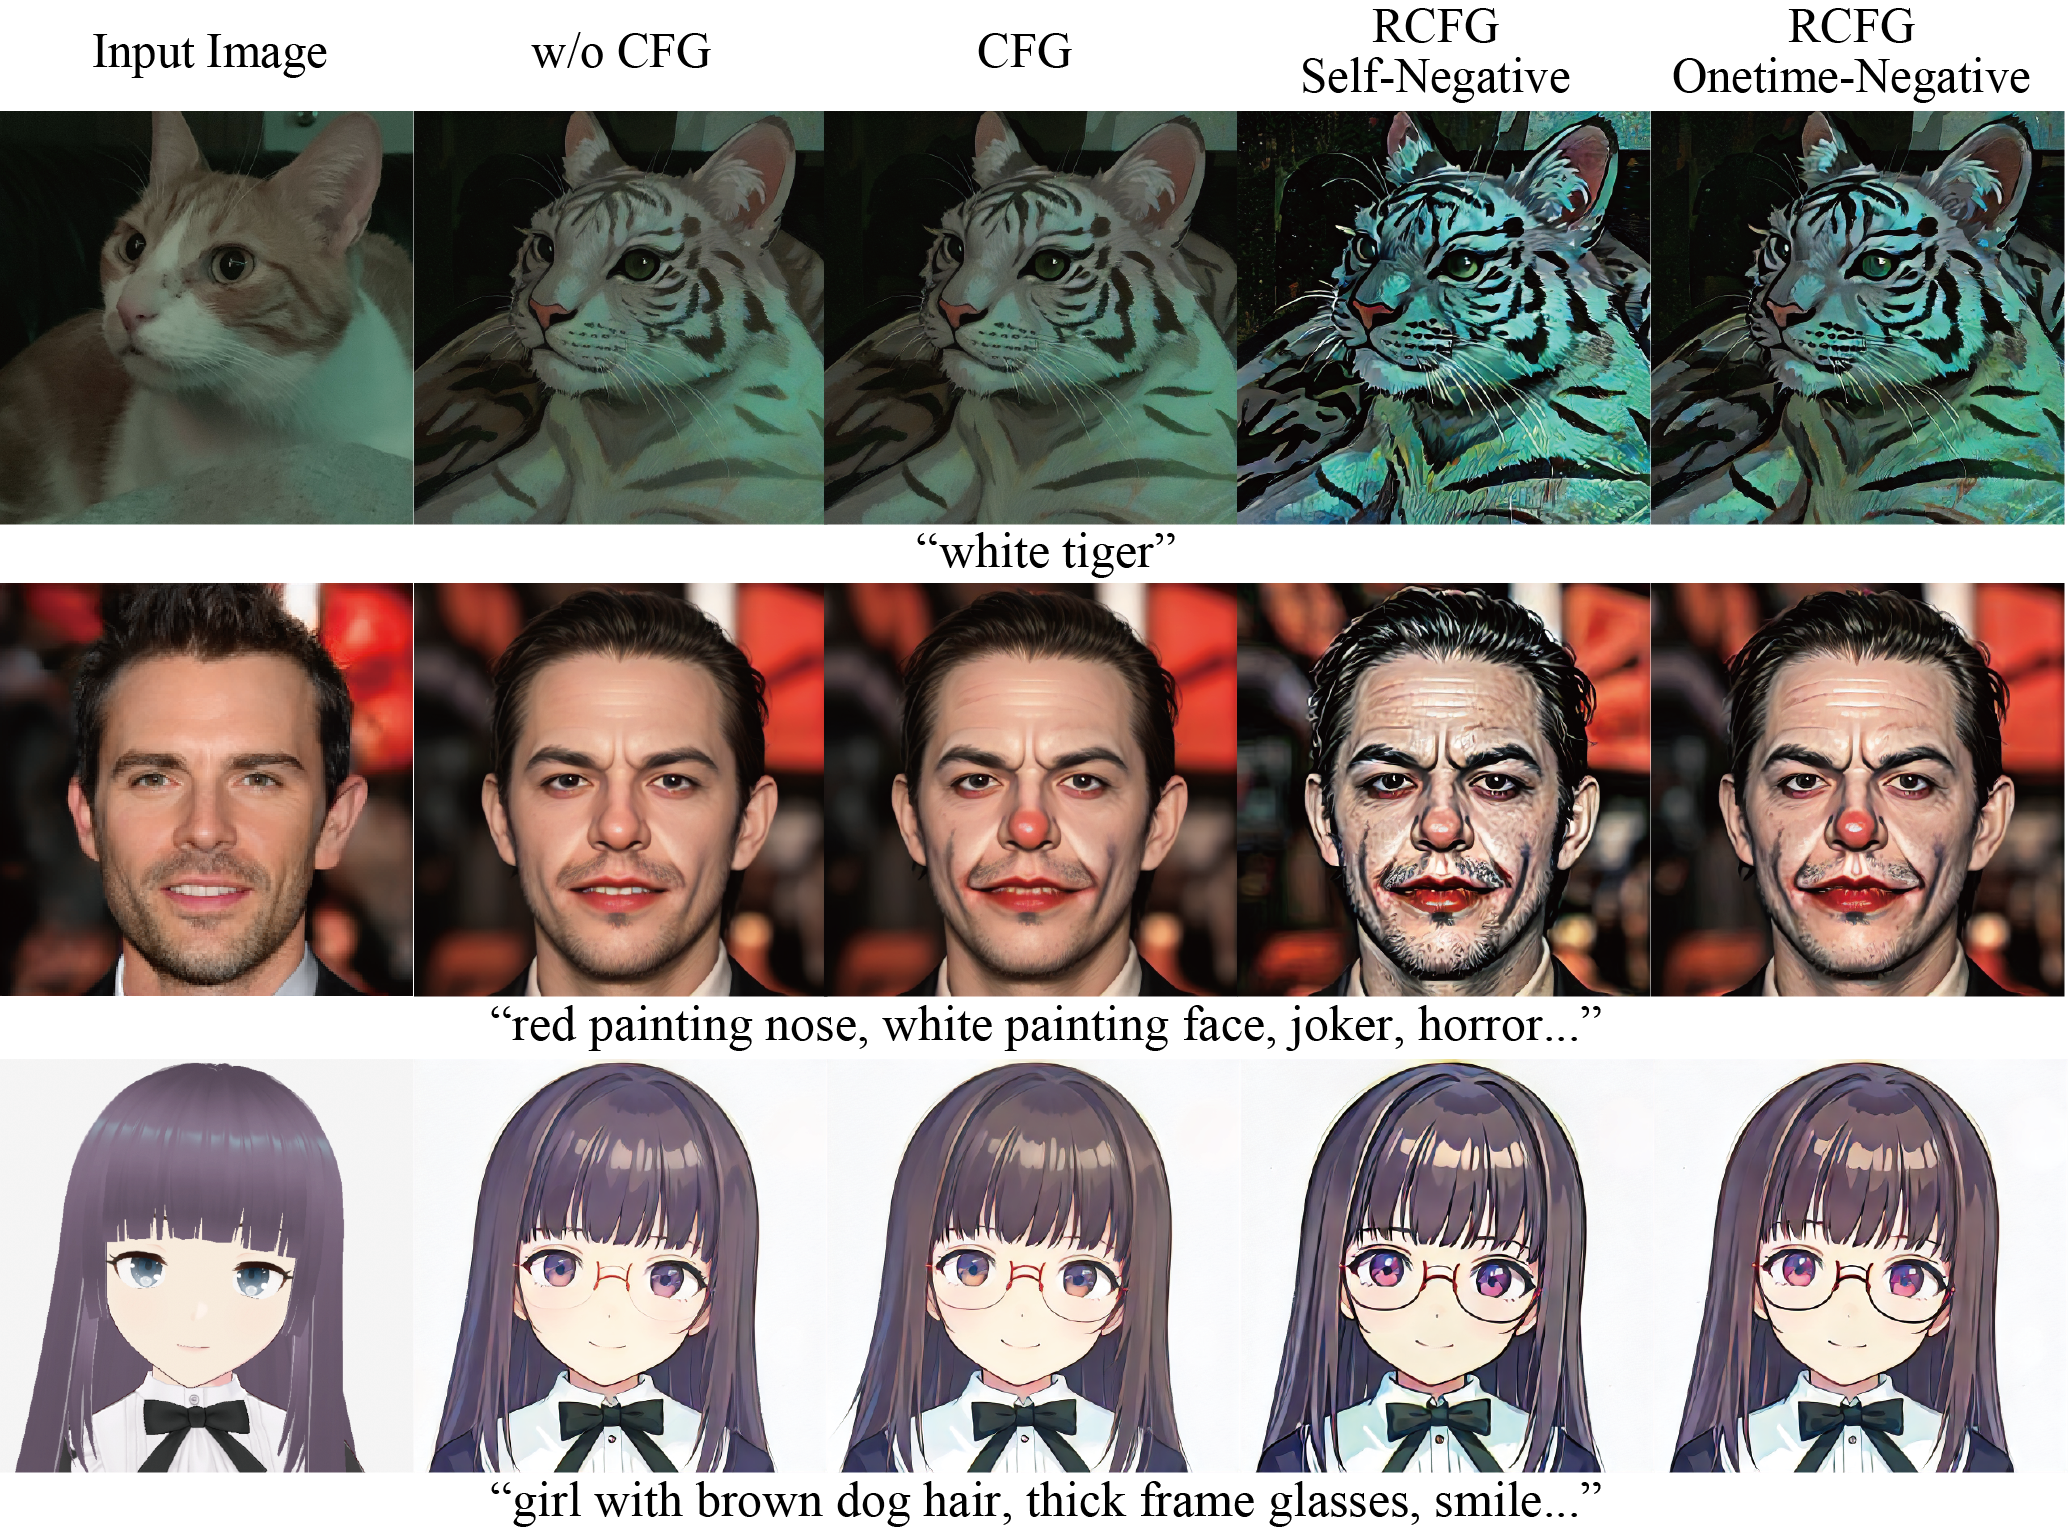
剩余 CFG (RCFG)

RCFG是一种近似实现CFG的方法,与不使用CFG的情况相比,其计算复杂度更低。它可以通过 StreamDiffusion 中的 cfg_type 参数指定。RCFG 有两种类型:一种是没有指定否定提示项的 RCFG Self-Negative,另一种是可以指定否定提示的 RCFG Onetime-Negative。在计算复杂度方面,将没有CFG的复杂度表示为N,将有常规CFG的复杂度表示为2N,RCFG Self-Negative可以N步计算,而RCFG Onetime-Negative可以N+1步计算。
用法如下:
# w/0 CFG
cfg_type = "none"
# CFG
cfg_type = "full"
# RCFG Self-Negative
cfg_type = "self"
# RCFG Onetime-Negative
cfg_type = "initialize"
stream = StreamDiffusion(
    pipe,
    [32, 45],
    torch_dtype=torch.float16,
    cfg_type=cfg_type,
)
stream.prepare(
    prompt="1girl, purple hair",
    guidance_scale=guidance_scale,
    delta=delta,
)
Delta 对 RCFG 的有效性有调节作用。
开发团队
Aki, Ararat, Chenfeng Xu, ddPn08, kizamimi, ramune, teftef, Tonimono, Verb(字母顺序)